Showing posts with label Art. Show all posts

Monday, 22 April 2019

Trying a Pottery Class


In February and March, my mom and I decided to try out a pottery class. It was a private pottery class that took place once a week for seven weeks at the instructor's little studio located in her house. The only pottery that I had ever tried was in art class in high school but that involved building with the clay by hand rather than with a pottery wheel. In this class, we used a pottery wheel to make mostly bowls and mugs, although I also made a small vase, a flower pot, and a plate. My favourite pieces that I made are the mug and plate in the photo above, which I matched by using the same turquoise glaze on both of them. I absolutely love the colour and it reminds me a bit of the famous Tiffany's blue of Tiffany's jewellery boxes.

The instructor was so nice and patient, especially with all of my questions of "Am I doing this right?" or "This is the next step, right?" Making pottery on a pottery wheel was so much more complex than I thought it would be. In tv shows and movies, you always just see the people holding the sides of the clay with their hands and forming it while it spins. When you are actually making pottery though, there is so much more to it than that. There are a lot of skills and techniques so I will not go into too much detail about them but I will describe the basic steps along with some commentary. First you need to measure out your clay and knead it in a certain way (apparently there are different techniques for kneading it but we used a technique called "ram's head"). After that, you kind of smack it down in the middle of the wheel with the flat side down, wet your hands (it is very important that you keep things wet but not too wet), and then you start pushing the clay up to heighten it and then you press it down for centering the clay. Centering is probably the hardest part, especially for beginners, since you really have to focus on how it feels between your hands and if it looks centered. Next, you make a hole in the center by pushing your finger down in the middle, making sure you leave enough of a base at the bottom and measuring it with a tool to make sure. After that, you start extending the hole and making the walls of the vessel taller if you are making a mug or bowl (since I mostly made vessels these are the instructions I remember the most). Before taking it off the wheel with some tools, you clean it up and smooth things out a bit.

The pottery has to harden a bit before you can do anything else but once it has been left for several days or longer, you clean it up even more and trim off a bunch of the extra clay using tools and you can also make and add a handle if you are making a mug. After leaving it to harden even more for several or more days, you fire it in the kiln before you glaze it and then fire it in the kiln again after glazing. Sometimes pottery will break or "explode" in the kiln which happened to some of my mom's pieces. The instructor for our class actually mixes her own glazes and it sounds so fascinating. It is also really weird when you first glaze the pottery since the colour of the wet glaze is not going to be the same colour that it will be after firing it. Also, even though you pick a specific colour of glaze, you still don't know how it is going to turn out after firing it. Several of my pottery pieces as well as my mom's pieces turned out to be quite different than the colours we thought they would be. But that's what makes it so exciting!

One big thing about making your own pottery is that every piece is different and the instructor is very artsy in that way that she loves how each piece is unique. She told us that sometimes people will buy two mugs from her and they will search all of the mugs in order to find one that matches the other as close as possible and, hearing her talk about those situations, it seemed like she thought it was silly since each piece is unique and that is what is so fun about having pieces of pottery. You get a huge variety instead of duplicates. Even when I thought that my pieces looked a bit messed up, the instructor assured me that they were not. Of course there are some major mistakes that you can make in pottery like having weak locations in the pottery, cracks, etc. that you want to avoid but you can't really go wrong with the aesthetics of pottery. I absolutely love that about pottery and I loved trying out a new art form. I am definitely thinking about trying out more pottery classes in the future.

Cheers,
Kaylie

Friday, 27 January 2017

Vision Boards (Positivity Exercise)


During the Fall, I made some vision boards after getting out of the hospital. I did this because I felt a bit lost when it came to what I wanted to do with my life. I'm a visual person and I had made a vision board before so I decided to make one to help me visualize and figure out my plans for the future. My first vision board ever was made at a vision board workshop at a local library and it was made on a large bristol board but I felt that it was too big. The whole point of a vision board is to glue words and pictures of things that you want in your life into a sort of collage and then place it somewhere where you will see it all the time so that the words and images will make their way into your mind. Hopefully they create a constant unnoticeable reminder in your head of what you want to manifest and eventually it will happen because you make it happen. My large vision board seemed too overwhelming. There were way too many pictures and words for my mind to take in.

This Fall, after playing around a bit with some words and pictures from magazines on a normal size piece of paper (around 8"x11"), I realized that a smaller vision board was much better. There were fewer words and pictures so it was easier for my mind to focus on them and remember them and it was also easier to narrow down exactly what I wanted from each vision board while being more artistic with the arrangements of the cut-outs at the same time. Also, I could play around with the words more and arrange them in a way so that they all flowed with each other when read in order. I made a total of three vision boards and I put them in plain frames without borders that you would normally use to display certificates. I'll talk about each vision board in more detail in this post.


My "What do I want to do with my life?" vision board:

This was the first vision board that I made out of the total of three vision boards. I wanted to create a vision board that would get me thinking in a more positive way about figuring out what I want to do in my life rather than stressing out about it all the time. I chose empowering images like that of a girl with a smile on her face and her arms in the air in a sign of success as well as that of Wonder Woman. Another image, which happens to be the biggest picture on the board, is that of a woman with her hands on a traditional image of a heart that is on her chest. I chose this image because the things that I really want to do in my life are things that I'm passionate about and I felt that this image was a good symbol for our passions. The words have to do with there being possibilities out there and how I can do what I really want and love to do. Just for fun, I covered the entire vision board in glitter glue (which is a bit difficult to see in the photo) to remind myself to have fun while exploring my interests.


My "Stress Less" vision board:

I created this vision board to focus more on keeping my mind relaxed and less stressed. The images are of activities that I love that are also relaxing and help with relaxation like meditation, yoga, and hiking outdoors. The words are reassuring and encouraging.


My "Creativity" vision board:

This vision board is all about art and creativity. I am a very creative person but I feel like I'm not focusing on the arts and creativity that I love as much as I'd like so I pasted a bunch of images of arts that I love like crafts, drawing and painting, writing, music, and photography. I also added words that are connected to creativity and at the bottom I put a little inspirational sentence about being original when it comes to art.


Those are the vision boards that I made and I'm really happy with them! I feel like I really improved since the first time I made one and really focused on exactly what I wanted to get out of these vision boards.

Cheers,
Kaylie

Tuesday, 28 June 2016

Hopping On The Colouring Book Bandwagon


Like so many people, I have bought a few adult colouring books. Yes, I have been swept up into the adult colouring book fad. Colouring is a way of relaxing and de-stressing. In my mind, it's a form of meditation since you are focusing and concentrating on something and relaxing. However, it wasn't so easy for me to start. I know what you might be thinking: "But it's just colouring! Kids do it! It's so simple! Just colour the picture! That's all there is to it!" You're right. But for me, I wanted to use it to relax, de-stress, and meditate and that's what made it difficult for me.

I used to be a major perfectionist. I'm not as bad now but that perfectionist tendency is still there within me. When I'm colouring something or making any kind of art or craft, the perfectionist in me peeks out through my eyes and makes it a bit hard for me to do my work without worrying about the way that it looks. I actually kind of like it, though, because it often helps me make my arts and crafts look better. When I'm colouring, however, I want to relax and not necessarily worry so much about the way that it looks so I'd rather push the perfectionist aside and tell them to just shut up. I decided to start doing that and to just treat colouring as an experiment with colour and different colouring techniques. It isn't a place for me to be perfect, it's a place for me to just try things out that maybe I can use when I make my own drawings. I can worry about making my own drawings or paintings perfect but colouring will be a place to just have fun and practice.

Another thing that makes colouring a bit difficult for me is the fact that I sometimes (or maybe more often than sometimes) have trouble concentrating on things for long amounts of time. So trying to colour a picture became very stressful for me because I would get to a point where I wanted to move on to something else. I have since learned to simply try to relax while colouring and then move on to something else if I want to or if I start getting too stressed out.

A more minor reason for why I have trouble relaxing while colouring is the fact that I press hard when I write or colour with a pencil. I need to learn to just loosen up and relax my hand. This isn't as big a problem as my previous two but it still prevents me from relaxing while colouring so it's something that I just have to work on.


Colouring can be a really great tool for relaxing and, for me, it has been a lesson in life. It has taught me to face my challenges and try to solve them. It has taught me to approach things differently according to the way that I am. Most of all, it is teaching me not to take things too seriously all of the time and to just have fun.

Cheers,
Kay

Monday, 22 December 2014

My 101 Things in 1001 Days List

Friday, 19 December 2014

Finding My Way


Life is tricky sometimes. It can be hard to find one's way throughout their journey of life. I'm 21 years old so I'm at that age where I'm a young adult. I'm officially an adult but I was also a teenager not long ago. As young adults, the world expects us to know what we want to do with our lives. They make it seem that way, anyway, and it sure feels that way. This is all crazy. I don't think that anybody ever really has their whole life planned out.

Since I'm in my 4th year of university, I've been thinking a lot about what I want to do next. I'm at a point where I don't really know anymore. I have an idea of what I want to do but I'm stressed out and I feel kind of stuck. I also feel like everything is going too fast. I want to slow down and have time to really think. I want to do some exploring along various paths.

I've realized that I am not someone who fits into "the norm." My life and who I am deep down inside is not what society expects of me (although, society is slowly learning to change and be more accepting). I feel like even in Canada, society expects us to live a certain life: go to school, get a job, get married, have kids, raise kids while working, work until an appropriate age to retire, and then enjoy retirement. This is not the life for me. I already know that I don't really want to get married or have kids and that is perfectly fine. I'm in school so that I will be able to get the job that I want but now I'm not exactly sure what job I want. I'm a creative person; I like music, art, and writing. I also like the outdoors. I want to get away from living the same way day after day. I want some adventure and I want to do something that will expand my mind and really make me think. The way that I feel makes me think of one of my favourite quotations from Doctor Who:

"When you’re a kid, they tell you it’s all… Grow up, get a job, get married, get a house, have a kid, and that’s it. But the truth is, the world is so much stranger than that. It’s so much darker. And so much madder. And so much better."
-Elton Pope 
(Doctor Who, Season 2, Episode 10, "Love & Monsters")


It's not just the "What am I going to do with my life?!" situation that is bothering me. I also have health challenges as well. I prefer to use the word 'challenge' as opposed to 'problem' because it's more positive. I have mild Crohn's Disease. I've never talked about it here but I am very open about it in my life outside of my blog. If you don't know what Crohn's Disease is, it's a gastrointestinal disease meaning that it affects the digestive system. Crohn's Disease is an Inflammatory Bowel Disease (IBD) and basically there can be inflammation and ulcers anywhere in the digestive system but most commonly in the small and large intestines. There is no cure for IBD yet.

I have inflammation in the end of my small intestine and in the end of my large intestine and I don't get pain. This is why my Crohn's Disease is considered to be mild. The only symptom that I get is bleeding from the inflammation in my large intestine (in other words, I get blood in the stool). The blood in stools is actually the only sign that I had that something was wrong when I first started getting it in my first year of university (December 2011). I am so grateful that I did something about my Crohn's Disease before it got worse.

Even though my Crohn's Disease is only mild, it doesn't mean that it doesn't bother me. I have to pay attention to my Crohn's Disease and do necessary things like go to doctor's appointments, go for tests, take medication, and watch my diet to ensure that my Crohn's Disease stays mild. Sometimes these things stress me out, which is another thing that I have to watch and try to reduce because stress can make things worse like it can with many health challenges. When there's continually blood, I keep thinking "Will I ever put my Crohn's Disease into remission or at least heal the inflammation in the end of my large intestine?" Inflammation in that location can be difficult to heal because bowel movements always irritate it. Right now I'm trying a combination of methods to try and heal the inflammation. I'm following a low residue diet as much as I can while still eating healthy, taking vitamin C and D everyday, exercising, doing yoga, meditating, and taking my oral mesalazine medication (for the inflammation in the end of my small intestine). I've also started drinking jasmine tea everyday (jasmine tea has many health benefits!) and I put honey in it (which is also very healthy!). So far, something here seems to be working because, when I've had blood, it has been less blood than usual and has actually been quite small of an amount. Sometimes, there's been no blood at all! I'm obviously very excited about this because: 1) My body is healing or at least getting better! and 2) I have found a way to deal with my Crohn's Disease that involves a lot of natural/alternative methods!

"Letting it get to you. You know what that's called? Being Alive. Best thing there is. Being alive right now, that's all that counts."
-The Eleventh Doctor
(Doctor Who, Season 6, Episode 4, "The Doctor's Wife")


Letting my Crohn's Disease "get to me" or bother me can be a good thing because it makes me want to do something about it! Also, it reminds me to be grateful for the healthy parts of my body and the ways in which I am healthy. As I mentioned before, when I think of my Crohn's Disease, I think of it in a more positive way by viewing it as a health challenge rather than a health problem. I choose not to view my intestines as bad guys but, rather, as the organs in my body that need more love and attention!

If you want to learn more about IBD and learn about a great organization in Canada that raises money to find a cure for IBD, visit Crohn's and Colitis Canada!


These are the two things that I'm dealing with right now. Of course, there are other things that I'm dealing with too like things going on in my family (mostly health and stress related), getting stressed out with school, and continuing my journey of living a life full of positive energy but figuring out my life and dealing with my mild Crohn's Disease are two of the main paths that I'm on at the moment. I just have to remember to stay positive and remember that I am in control.

"Our fate lives within us, you only have to be brave enough to see it."
-Princess Merida
(Disney Pixar's Brave)


We all go through times in our lives when we become overwhelmed with everything, whether it be things staying the same or too many changes. We just need to pay attention to them in order to learn, grow, and be thankful for the experiences that are building our futures.

-Kaylie

Thursday, 30 October 2014

DIY: Personalized Stickers


I wanted Halloween stickers that had music notes or some kind of music theme to give to my piano students. I knew that it probably wouldn't be easy to find some plus I don't need a lot of them so I just decided to make my own. 

I took white sticker labels and divided them into rectangles with a pencil and ruler. I then wrote and drew on each of them with Sharpie markers. You can write and draw whatever you like! You can also use any writing tool (markers, pencil crayons, crayons, pens) although I like how Sharpie markers show up. I decided to write 'Happy Halloween!' and draw music notes and pumpkins. I then cut out each of the stickers. When I want to use the stickers, all I have to do is peel off the back!

This is a super easy way to make personalized stickers for any holiday, occasion, or theme so have fun with it!
-Kaylie

Friday, 5 September 2014

Gratitude List: The Beauty of Life


Today, as a little pick-me-up,  I re-listened to the description for my key signature in The Signature Series on CBC Music. The Signature Series has descriptions for the key signatures in music and lets you figure out which key signature you resemble the most. My key signature is D-flat Major: The Free Spirit. I wrote about it here on my blog before. After listening to the description of D-flat Major again after a while of having not listened to it, I realized how good it made me feel. I felt so happy listening to it and it made my day so much better. My day was already good to begin with but it just filled me with so much joy! I decided that I needed to make a post about gratitude, happiness, and the beauty in life! So here's a little random list of beautiful things in life that make me happy and make me so grateful!

~ The mysteriousness of mornings ~ Books, books, books, and more books! ~ Colours everywhere ~ Forests of endless trees ~ Looking at art and making art ~ Listening to symphonic music that is so beautiful that it makes you cry ~ Singing out loud, even when there is no music playing ~ Going for walks outside all by myself ~ Meditating ~ Talking to my dog ~ Thinking of my ancestors ~ Having such an amazing family ~ Having amazing friends that are not afraid to be themselves and encourage you to do the same ~ Plants inside the house ~ Pretty, bright-coloured flowers ~ Happy people ~ Sunshine ~ Interesting clocks ~ Having endless possibilities for things to do ~ Things to look forward to ~ 

What's beautiful in your life? There's so much to be grateful for!
-Kaylie

Wednesday, 13 August 2014

Positive Life: Sunflowers and Gratitude


I'm a big fan of Vincent Van Gogh. He's one of my favourite artists! I saw some of his paintings at the Art Institute of Chicago while on a band trip to Chicago, Illinois and it was incredible to be in a room with some of his paintings, one of which was his bedroom painting!

I decided to buy this cute kit called Van Gogh's Sunflowers In-A-Box when I found it in a dollar store for 3 dollars. I was pretty amazed when I saw how much this kit usually costs! The kit came with the pieces to make the sunflowers, the box which is used as the base, and a little book about Vincent Van Gogh and his sunflowers. It was fun to put together the sunflowers and I now have them sitting on my desk (AKA my "office").

In the little book, there was one piece of information about Van Gogh and his sunflowers that I love. It says that for Van Gogh, sunflowers were a symbol of gratitude. I think that that is beautiful and since gratitude is so important to me, it means so much to me that my favourite artist saw sunflowers as a symbol of gratitude. It also makes me view his sunflowers differently. A lot of people simply think of Van Gogh as a very depressed man but there was obviously so much more to him than anyone could ever know or understand. He was complex and he viewed the world differently, as all great artists do. In his paintings, we can see through his eyes and appreciate the beauty of life.

-Kaylie

Tuesday, 27 August 2013

Positive Life: Positive Life Journal


I like writing and I also like art so I wanted to use my two interests to help me record what I learn about living a positive life, work out challenges in my life, let my emotions flow, and celebrate living a positive life. I took a large, thick notebook filled with lined paper and decorated the cover. I decided that I wanted a simple cover so I stuck on some craft foam that has a sticky side and I wrote my name in fancy letters with a heart. On the first few pages, I glued printed information from the internet on various positive life related things. Some ideas for Positive Life Journals are collages, gratitude lists, diary entries, drawings, poetry, and much more! Make your Positive Life Journal truly your own and use it to help you on your journey of living a positive life! Writing this post, I realized that I haven't written in my Positive Life Journal all summer so I'm going to start writing and making art in it again.

Here are some pictures of my Positive Life Journal to give you some inspiration:

I glued a bunch of hearts that I cut out of a flyer the other side of the notebook cover to remind myself to love myself just the way I am.

One idea for your journal is to make happy pages. Basically, just make a collage of a bunch of things that make you happy. You can even make each collage themed! When you're sad, just look at your happy pages and you'll be smiling in no time! I like hiking, biking, camping, and Geocaching so I decided to make an outdoors themed collage with magazine and flyer pictures.


-Kaylie


DIY: Lips Wall Art


After seeing various lips artworks, including ones where you actually put on lipstick and kiss the paper, I decided to make my own version using watercolour paints.
I first drew all sorts of different lips all over the paper after gathering inspiration from pictures of lips on the internet. I then proceeded to paint them each a different shade of red, pink, or purple. After I finished painting them, I outlined them in black sharpie. I felt that the corners needed something so I glued two strips of squiggly gold ribbon in each corner of the paper. You can frame your wall art or attach it to the wall like a poster.
I'm going to put my lips wall art by my vanity desk! I don't wear lipstick (or any other kind of makeup) but it will just look nice and it goes with the whole vanity desk theme.

-Kaylie

Tuesday, 20 August 2013

DIY: Mini Travel Diary


It's so fun to keep a diary during a trip. Even if you don't have time to write during your trip, you can write down the memories after you return. I thought of making this mini travel diary because it's easy to bring along and toss in your bag or put in your pocket. After taking it along on a recent family trip to a few places in Ontario and Michigan, I have decided to start a new tradition of making one of these mini diaries for each family trip (long trips, not just 1 day trips). These are great because, like photos, they hold the memories of your trip. 

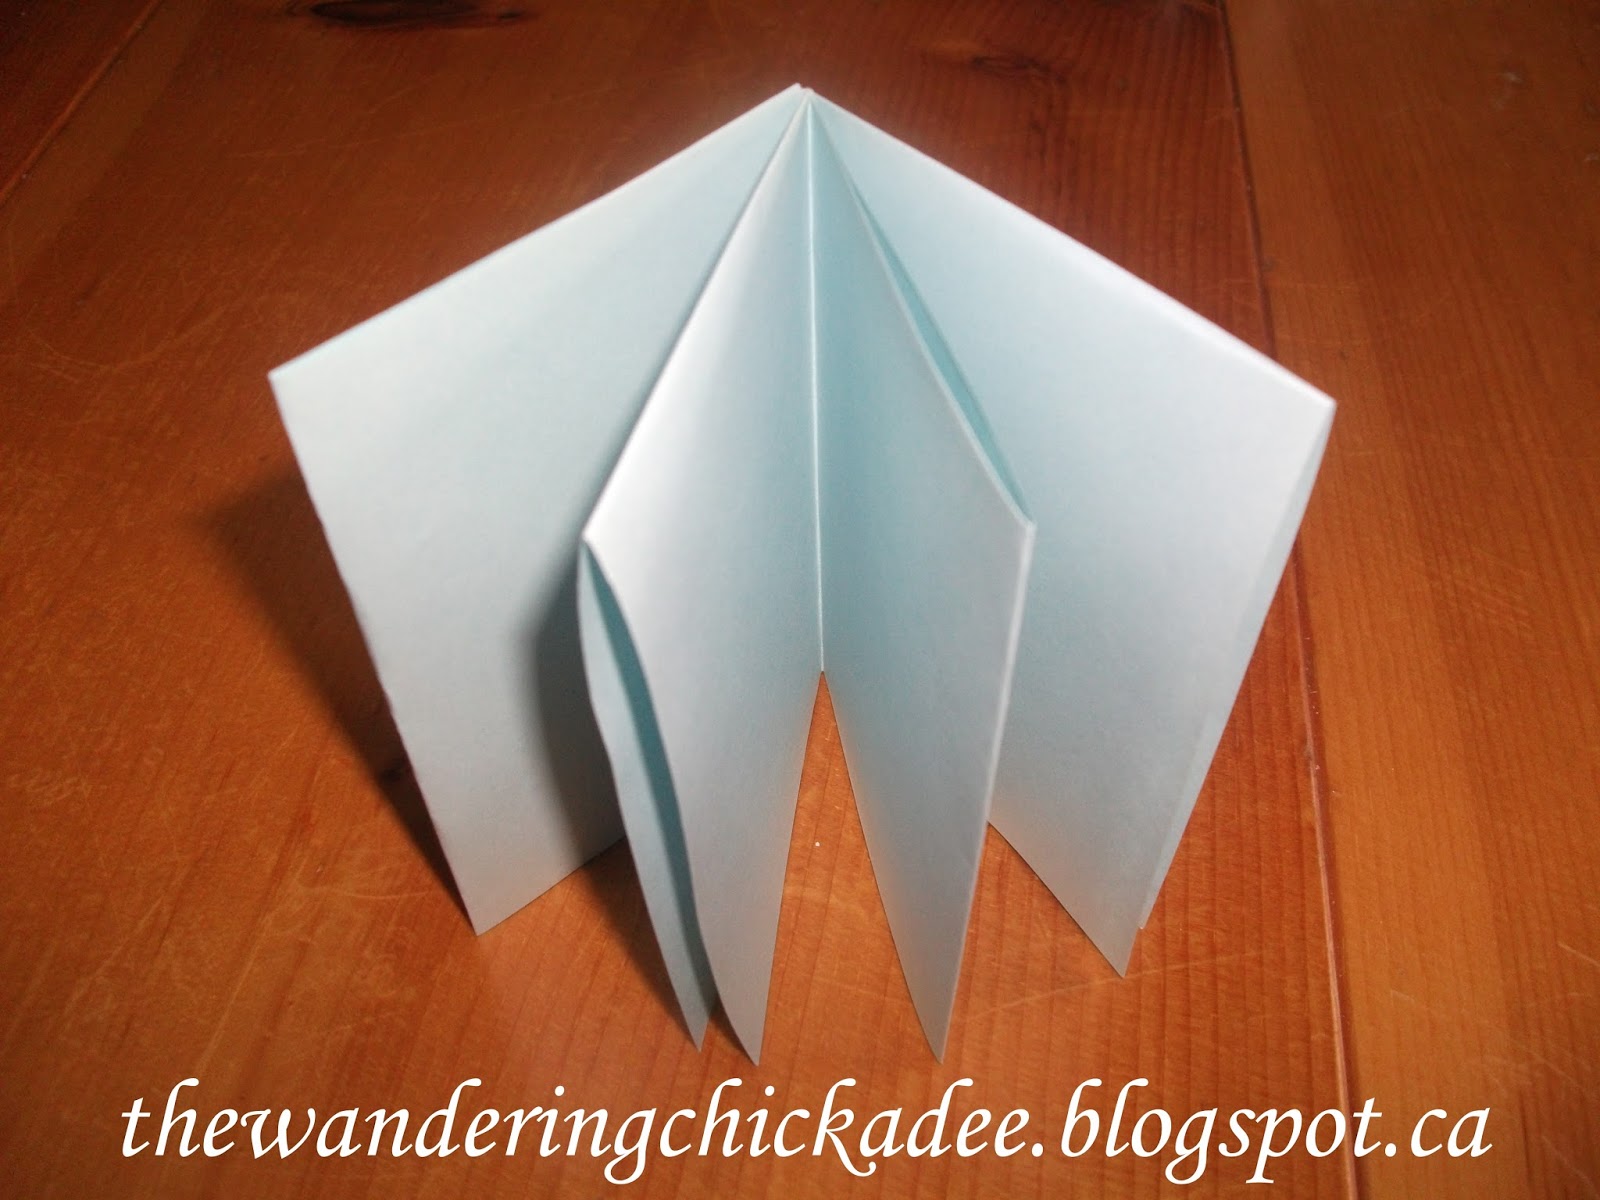
1. To make the pages, take a normal sized piece of paper (like the kind that you use in a printer).

2. Fold it in half.

3. Fold it in half the other way.

4. Fold the two ends of the paper inwards so that you are left with 8 rectangles on your paper.

5. Fold the paper in half and cut down the center line so that when you open it up again, there is a cut slit along the center that only goes along the two center rectangles.

6. Fold along the folds of the paper so that the slit in the paper creates an open diamond shaped hole.

7. Push the two sides of the diamond together to create four rectangles. 

8. Arrange the rectangles into a booklet shape by making them all face in the same direction.

9. To make the cover, take a piece of card stock paper and trace your open booklet of pages on the card stock paper.

10. Cut out your rectangle.

11. Fold the cover in half and insert your booklet of pages.

13. Make sure everything is aligned and open the booklet to the very center. There should be two rectangles on both sides when you open it up to the center. With a needle and thread (choose a colour that works best with the colours of your diary), sew right down the center. Make sure that the tail of the thread on both ends is inside the diary so that it isn't noticeable on the outside. 
In the first image, you can see what the sewing looks like on the inside and in the second image, you can see what the sewing look likes down the spine on the outside.

Your mini travel diary is complete!

You can decorate the outside and inside in any way that you like! You can also use any colours of paper that you like! This diary can fit 8 days so if you like more, follow steps 1-8 to make extra pages and, before you sew the diary together, open both booklets of pages to the very center and lay one booklet on top of the other and then continue through the rest of the steps of sewing. If your trip is less than 8 days, you can put your trip schedule on the first page, reflect on your trip on the last page, etc. Be as creative as you like with this project!


Enjoy recording the memories of your trips!
-Kaylie


Thursday, 1 August 2013

DIY: Fern Leaf Stamped Wall Hanging

I decided to have some fun and try stamping using leaves. For this project, I used fern leaves because we have tons of ferns growing around Northern Ontario and I just had to go to the back of my backyard to find some of these beauties. The wall hanging turned out pretty and I like the nature feel that it brings to the house.


First, I found some ferns and picked one of the plants. I took the leaves off of the stem. I wanted to use a different leaf for each leaf stamp. For the stamping, I took a leaf and painted the front of it with acrylic paint. Then, I pressed the leaf, painted face down, onto the spot on the piece of the paper where I wanted the stamp to be. Once I had pressed the leaf down enough, I carefully peeled it off of the paper. I repeated the process to achieve the design seen in the final product. I wanted my stamps to be simple and just point upwards side by side but you can arrange the stamps any way you like. Also, remember that the stamps don't have to turn out perfectly. Plenty of mine smudged or didn't have enough paint and they still turned out great. Below, you can see the stamping process in photos:

Take leaf off of stem.

Paint the front of the leaf.

Press the leaf, painted face down, onto the desired location of the paper.

Peel the leaf off and your stamp is complete!

I made three panels of stamped leaves using square pieces of white paper using three different colours. Once I was finished, I made holes in the four corners of the first and second panels and in the top corners of the third panel using a hole puncher. I tied the panels together by knotting white thread through the holes. I then tied the top panel to a branch and tied some white string to the top of the stick to create a hanger.

I hope you enjoy adding a little bit of nature to your home!
-Kaylie


Tuesday, 26 March 2013

My Favourite Web Comic: Girl Genius


Since my brother started reading a web comic, I decided to search for some web comics that I might enjoy reading and I came across one called Girl Genius! It is a web comic written by Phil and Kaja Foglio with drawings by Phil Foglio. They release a new page on the web every few days and they have lots of pages since they’ve been doing this for a while. They have also printed the comics into actual books that you can buy if you so desire. Information on purchasing the books can be found on the Girl Genius website. I really recommend reading their New Reader page before you start reading and if you want to know more information, check out their FAQ page. This web comic is recommended for teens and up because of some of the content. I really recommend that you start reading from the beginning and see if you’ll like it that way instead of me explaining it. If I were to simply describe it, I’m afraid that I might give away what happens. Also, you won’t really know if you like it if you never even see the beautiful illustrations. If you want to be able to follow along the story at all, you’ll have to start at the beginning because there is just so much to it. I will tell you this though: this web comic has a Victorian style steampunk theme and it has adventure, science, heroes and bad guys, mystery, and romance! Yes, it has all of that good stuff! Just read a few pages and you’ll probably get just as hooked on it as I am.

Happy reading!
-Kaylie

Wednesday, 27 February 2013

Artsy


I love art! I took art class every year in high school and I loved it so much! I do not find it surprising that I love art as my Mom is talented at art. She took art class every year in high school too and her paintings are hung throughout our house. It was one of her hobbies. My brother also likes art so our family is quite artistic. Our Mom always encouraged my brother and I in art as we grew up and she was always making things with us. We still make things together and we love it! My favourite kind of art is drawing.

Recently, I purchased a pretty day planner on sale at Michaels. It is an Ed Hardy day planner and it is decorated with his artworks. One of his artworks is the cover and then there is a new artwork every month right before the calendar which comes before the agenda pages. I love the artworks so much and I looked at some of his other artworks in Google Images. They are gorgeous. They have bright, vibrant colours and a lot of them include flowers and animals. Don Ed Hardy is a retired American artist who has designed tattoos and created drawings and paintings. There is even clothing based on his artworks.

Here are some pictures of the day planner that I purchased (these are my favourite artworks in the day planner):

This is the cover. It has a sheet of plastic that sits on top to protect it.


When I’m done with the day planner at the end of the year, I’m going to take out all of the artwork prints and frame them because they are all just so pretty!

-Kaylie